LONG QUARRY POINT
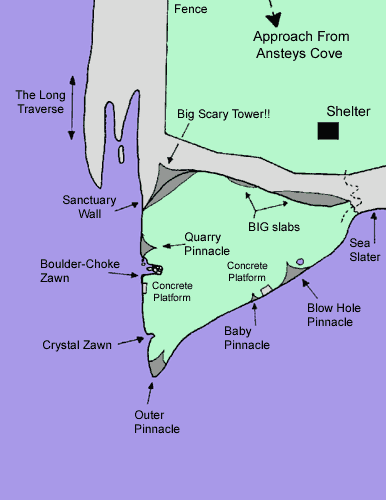
This place is home to a fine selection of Deep Water solo routes, including the hardest in The Shire (Christine Fr. 8a). There is plenty of potential for larking about, with a handful of fun little traverses and, for the mazed, there are several good jumps. The huge slabs at the back of the quarry are home to several fine trad routes, as is The Sanctuary Wall. A short walk away the well-known sport routes of Anstey's beckon...
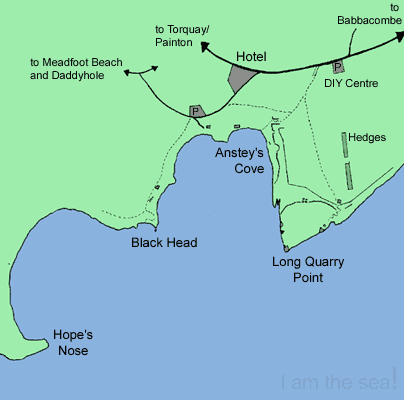
Approach: If approaching from the Exeter (A38/A380) follow signs for Babbacombe (turn left at traffic lights!). These should lead you through Babbacombe, after which carry straight on until a DIY store and garden centre is seen on the left. (Free parking was available here until summer 2008 - parking is now restricted).

Tides: A trip is best based around high tide... but check tide info for each route.
Routes: 18 described from HVS to XS 6c (Fr8a)
Nearest Crags: Black Head for Deep Water Soloing. Anstey's Cove (mostly harder sport climbing) and The Sanctuary Wall (mostly harder trad) are very close.

SEA SLATER CLIFF
This is the crag to the left (looking out) of the steep descent path from The Downs. It's a bit on the high side for deep water soloing but is above water, and our intrepid new router Martin Crocker has added a route! The exact relationship between the following 2 routes is not yet known.
Tides: If you're mazed enough to go for the high solos here then a high tide would be advisable.
It is quite fun to traverse along the botom of this crag (this is actually final section of The Kraken in reverse) - this is used to gain the routes.
Un-named HVS 5b (S2)
#
50ft The wall left of the obvious groove on Sea Slater cliff. FA Derek
Rydon, Jim Cheshire 1.6.97 (Not yet soloed)
Fused With Higher
XS 5c S2 ** #
80ft (gulp!) A fabulous route on good rock. A little high for DWS comfort
and probably best led (about E2/3). Follow Sea Slater (the groove) up its
crack to a point where a bulging undercut shelf goes left across the main
face of the buttress. Hand traverse left for 12ft and pull up into a niche.
Ignore the flake crack on the left and climb, veering slightly rightwards,
up the steep white wall on layaways to gain good jugs and a scoop. Move up
and L onto a grassy ledge then pull straight over the headwall on superb holds.
FA Martin Crocker 10.10.98 (solo after top roping).
For the following route traverse until you arrive at a quarried platform beneath a slab:
Mirthless One XS 6a
S0 #
30ft This is the short but reasonably impressive arete below the Love
Not War slab. From the lower quarried platform traverse intricately right
on suspect rock to the overhanging arete. Strenuous moves up this lead to
a monster hold. Finish more easily up the slabby arete. A low-level crux and
deep water make up for the risk of snapping off into the drink. FA Martin
Crocker 10.10.98 (solo after cleaning).
BLOWHOLE PINNACLE
After descending into the quarry you should see a hole over to the left. This is home to two of the hardest Deep Water Solos in The Shire.
Tides: A good high tide is recommended for these routes.
The easiest approach for the following two routes is made by a straightforward descending traverse from the left (looking out). This is possible at all states of the tide.
No Time Like Now HVS
4c S1
60ft An exposed excursion. Start as for Waiting For Charlie. Follow
the obvious line of holds diagonally left above the cave for 30ft to a junction
with Waiting For Charlie (i.e. above a thread) at a flake. Pull up to a block
ledge then step onto the slab above to gain the ridge. FA Martin Crocker 10.10.98
(onsight solo)
Waiting For Charlie
XS 6b Fr 7c S1/2 **
60ft The fiercely overhanging, bolted seaward edge of the cave. Follow
the line of bolts to a thread, then either move left and follow the in-situ
gear, or move right to an easier finish as for No Time Like Now. FSA Dave
Henderson 17.8.98 (solo after working the moves on the lead). A water depth
test resulted in a bruised buttock boulders lurk in the dark seaweed. High
tide recommended. Repeated solo by Matt Cooper.
Losing My Religion
XS 6c Fr 7c S2 **
60ft Another large selection of grades! This is the line of bolts emerging
from the back of the cave to eventually reach a junction with Waiting For
Charlie. If redpointing/working the route on a rope you are best off going
at lowtide when you can start on a boulder and climb passed the first couple
of bolts - when going for the solo you should wait for the biggest spring
tide to give maximum depth over aforementioned boulder! You will then need
to traverse in at a higher level - this can be gain by descending into the
cave via a hole! FSA Ken Palmer 2000 Rockfall has made this harder - not
repeated since.
Blue Planet E6 6b
7b+ S2 **
50ft The line of staples starting on the leftside (facing in) of blowhole
pinnacle (abseil approach - not recommended in high seas). Follow pockets
and cracks on lip of cave to its apex and then take the still tricky wall
above. FA Ken Palmer Summer 2001 (also deep water soloed by Ken). Pick a good
high tide.
Chrstine E7 6c
Fr 8a S1 #
The bolted line right of Blue Planet. A leaning wall leads to a hands off
rest below the roof. Hard moves lead through and up from this. It shares the
finish with Blue Planet. FA Ken Palmer (also soloed by Ken Palmer 2003)
BABY PINNACLE
Looking seaward, a "baby pinnacle" can be seen 20 yards right of The Blow Hole Pinnacle (home to Losing My Religion). This is home to the worthwhile Producer and Scorpio. To the left of this, looking out, is a concrete platform. Retro Scare and Rapido can be gained from here as long as the sea's not too rough and you're not there at a high tide...if you do arrive at high tide it is possible to gain Retro Scare and Rapido from a notch on the Blowhole Pinnacle. The latter approach is Very Severe and a bit scary.
Tides: Avoid going at the lowest and highest state of the tide - most other states of the tide should be fine (but as always we accept no liability if it isn't deep enough - if in doubt check the depth for yourselves).
Retro Scare XS 6a
Fr7a S0/1 *
30ft From the platform descend down a short, steep wall. Traverse right
(facing in) for about 20ft until beneath an overhanging groove, above a niche.
Climb steeply up the groove to a sharp flake. A long move L gains a sloper.
From here follow seemingly endless slopers to the top. FA Dave Henderson 14.8.98
(onsight solo)
Rapido XS 6b Fr 7a+
30ft S0 *
30ft Start up the overhanging groove of Retro Scare then nip off left
to pockets on the wall. Move left again to gain an obvious right- facing sidepull.
From this lay one on out left to gain slopers and a still tricky finish. FA
Martin Crocker 10.10.98 (solo after top roping).
To the right (looking in) of Retro Scare is an area of easier rock. This is a bit loose and scary, but can be climbed at about Very Severe (this is also the alternative high tide approach mentioned above). It is also possible to traverse from here to the Blow Hole Cave - getting through the cave has only been done at low tide, although the traverse is best at a higher state of the tide.
Producer XS 5a S0
*
30ft Descend from the concrete then traverse left (now facing in) to
gain a ledge half way up the face. The small central groove now leads, not
without interest, to the top. FA Matthew Thompson 21.7.96 (onsight solo)
Scorpio VS 4c S0
25ft Descend to the right hand side of the pinnacle (facing out) then
traverse right (facing in) on good flakes to gain the half height ledge and
finish up the wall to the right of the previous route. FA Matthew Thompson
21.7.96 (onsight solo)
There is a fun traverse along the bottom of the Baby Pinnacle.
BOULDER CHOKE ZAWN AREA
Arapiles, Oh Arapiles
XS 6a Fr7a/7a+ S0 **
Fingery, sequency and above good water. A perfect deep water solo
at mid tide and above. 30ft This line is just to the
right (when looking at it from below) of the impressive arete to the left
(looking out) of the "Boulder Choke Zawn". Descend to a concrete
platfrom to the left (looking out). From the right side down-climb beneath
an iron spike and then traverse left (now looking in) for about 8 feet until
below some bolt stubs. At high tide it is possible to traverse in at a higher
level. FSA (probably) Dave Henderson 14.8.98
Once a Dogger
XS 6b Fr7b+ S1 **
The line to the right (looking out) of Arapiles looks a little dangerous but
has so far proved to be safe. Highish tide recommended. 30ft
Follow Arapiles to the rest then make slappy moves around the arete to the
left. A long slap then gains a good edge up the the left followed by moves
up the right edge to gain the top. FA Neil Gresham
CRYSTAL ZAWN
Home to the most amenable (but not necessarily the safest!) Deep Water Solos in the quarry. This area is found just to the right of the Outer Pinnacle.
Tides: High tide is best, but Honour Bright and Honour Bright Arete are still OK at lower tides.
To gain the following two routes descend the large slab to the left (looking out) - this is about V.Diff in descent. From the base traverse left (facing in) and make a funny step across a corner to gain the wall. The first line you come to is:
Midget Gem XS 5a S2/3
25ft An entertaining little chap on good juggy pockets - wait for a good
high tide if you want much water beneath you. This is the right hand line.
FSA Nick White
Crytstal Pockets HVS
5a S1 **
25ft Another fine little route. A bit safer than the Midget Gem still
worth going a few hours around high tide. Climb the line up the middle of
the wall! FSA Nick White
Honour Bright Arete
XS 6a S0 *
25ft A tricky little fellow. There are two possible approaches, both worth
doing and about the same standard - either approach as for Crystal Pockets
(see above) by descending the slab, or as for Honour Bright from the other
end of the wall. Either way sees you climbing the arete with the crux near
the top! FSA Nick White
Honour Bright XS 5b
S1
25ft The obvious overhung corner is gained by traversing in from the other
end (i.e. right looking out) of the wall. Fine climbing although a the rock
is a tiny bit scary near the top - this is compensated for by quite deep water.
FSA Nick White
