Intro | Haytor | Haytor Quarry | Lowman | Myrtle Turtle Quarry | Holwell Area | Smallacombe | First Ascent details
LOWMAN
Approach From Bovey Tracey follow signs towards Widecombe. These should lead you uphill for a few miles. At the very top of the hill a large lump of granite is visible to the right of the road. Park in the car park at the top of the hill, on the left.
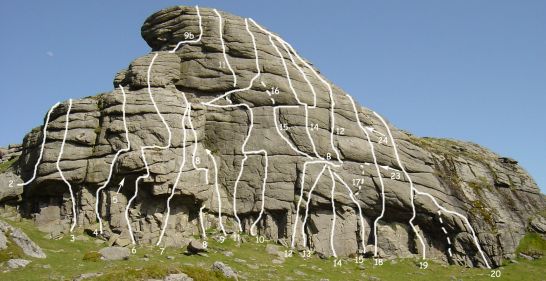
At the top of the hill on the right is Haytor whilst the diminutive lump on the left marks the top of Lowman (the routes are on the 150 ft face the other side). The routes on Lowman are best gained by skirting round the left side of the hill from the car park - this will bring you to the base of the crag.
1) Crunchie E2 5c
The left side of the overhang facing Haytor West Face (to the right of the old iron steps onto the summit of Lowman). (Not marked on the topo).2) Screw Very Severe 4b
A tad green but worthwhile and bold climbing. Start atop a large block adjacent the wall. 1) Step onto the wall and traverse right towards the arete until it is possible to climb more of less straight up to the top!Posidrive E4 5c #
The direct line up the wall to the left of screw. Tricky, reachy and committing start which could be made fairly safe with a few mats.3) Thursdays Child E5 6b
1) From the base of the obvious offwidth right of the large roof make a powerfull move of an undercut to gain a poor break up and left (also arrange gear off the undercut). Make some tricky moves to get established above and finish direct.4) Honeymoon Corner Severe 4b
To the left of the large overhang of Outward Bound is a short corner a little way up the crag, above a pedestal. 1) Gain the top of the pedestal and climb the corner to gain a ledge (possible belay). Step left and go up to the top, via a small overlap. Hard for the grade.5) Shacked Up E1 5c #
This takes a line between the corner of Honeymoon Corner and Outward Bound.6) Outward Bound HVS 4c,4b **
An impressive route for the grade... pitch 1 looks like a big overhanging but the climbing is more like a traverse of a hanging wall... apart from a couple of strenuous pulls to turn the lip. Start beneath the obvious line of hanging flakes/hanging wall on the left side of the overhang. 1) Gain the overhang - relatively straightforward - arrange gear then commit to the roof... keep going! Slings can provide easily arranged gear on the roof!! At the lip make some more strenuous moves on good but spaced holds to a ledge (belay advised if your second's a bit nervous). 2) Move right and pick a line above to gain the top!7) The Flier E1 5c, -
A challenging route that is strenuous and intimidating. Hard for the grade (unless you climb harder than E1, in which case it may seem ok!). Climb the line of weakness between the previous route and the right end of the roof. Take care arranging good gear before committing to the overhang. 1) Climb to and through the roof, move up a bit then right to climb the wall above (as for Raven's Wing) to belay on a large ledge (atop the chimney of Raven's Gully). 2) Finish as you want!8) Raven's Wing Very Severe 4b, -
An underated route that is quite a gem. Start beneath the right hand end of the overhangs. 1) Climb the corner left of the initial layback crack of the next route for 15ft until possible to make a fine few moves left to the arete. Climb the arete to gain a break, then move left and climb the wall to the large of Raven's Gully. 2) Move left and climb the slab to it's top!9) Raven's Gully Severe 4b, -
Classic climbing - fine laybacking initially followed by a nice chimney. 1) The obvious line. Climb the right hand crack to a rest, then either climb the crack on the right or the slab to the left to gain a sloping ledge beneath the fearsome overhanging chimney. Struggle up the chimney to a decent belay ledge. 2) Climb the easy chimney above to finish or go for the:Desperate Direct Finish VS 4c From the top of the easy chimney step onto the wall and traverse rightwards. Move up on small holds through a bulges until easier climbing leads to the top.
10) Interrogation E3 6a, 5b ***
A excellent and sexual line which is one of the classics of the South West. Can be lead in one long pitch if care is taken with the ropework on pitch 1. 1) Climb up onto a rounded flake 6ft right of Raven Gully, then up to a peg runner on the right. Follow the line to the horizontal break (poor peg and good wires/Friends) which is followed with difficulty left to better holds.Move up and follow flakes/shallow groove to a bulge. Move left on projecting holds and up to a large belay ledge (as for Raven's Gully). 2) Traverse back right and gain a standing position on the prominent "ledge" with awesome exposure (make sure you mate - who is now busy taking photos of you from the belay - has at least one hand on the ropes or tied you off!!). Move up to a groove and follow this until things get less scary... and eventually you gain the summit via easy slabs.11) Interrogation Superdirect E5 6a
Rarely climbed but very worthwhile. Takes many of the best bits of the original route and adds extra spice to bump up the grade. The top will be a tad lichenous and pre-cleaning may be required. 1) Squeeze your way up the wall between Raven's Gully and the start of the parent route to gain the a break at 30 ft. Follow the parent route to the projecting holds then move up right to the scary mantel. From this head up and left to a bulge and up a slab to a groove.12) Aviation E1 5a/b ***
Flawless... best enjoyed on a still summer's evening. Another South West classic. It is possible to climb the route in one pitch if care is taken with the ropework. 1) Climb a pillar of fine grained granite until it is possible to pull up right into the groove/crack. Climb this to it's finish at a bulge then traverse rightwards to a large flake. Belay. 2) Move right then up through the bulge above. Climb up and left to the base of a runnel/groove which leads scarily to an easier finish. Belay miles back, off a block and/or the iron ladder.13) Bermuda Bill E4 6a
The offwidth right of the start of Aviation leads to a crux moving up on obvious undrcuts. 1 peg. Large cam useful. Finish up whatever takes your fancy.14) Igneous Pig E3 5c *
Excellent and varied. Can be climbed in one pitch. 1) Climb the wall of fine granied granite to the overhang. Move through this on good undercuts to gain a poor ledge then carry on to the belay of Aviation (on the large flake). 2) From here move left beneath a bulge then climb a good layback flake for 20 ft to the next bulge. Move slightly left then make hard, bold moves on crystals and nubbins to an easier finish. Note: this finish is a few feet left of Rhinoceros.15) Rhinoceros E3 5c *
Excellent and varied. Can be climbed in one pitch. It takes the obvious undercut flake-line to the right of Igneous Pig. 1) Climb to and through the bulge at a crack then follow the undercut flake to the left until you can gain a sloping ledge on the left (shared with Igneous Pig). Climb above to gain the belay of Avaition at the large flake. 2) Traverse left (reversing Aviation) until beneath an obvious groove. Climb this to a bulge at it's top then move right until it is possible to stretch over the bulge and make a few tricky moves to easier ground.16) Die Laughing E5 6c #
The link through the bulge from the top of the Rhiniceros groove (on pitch 2) to gain Interrogation. Hard and probably unrepeated.17) The Camel E6 6c #
Thirsty work!! Has only been led with pre-placed RP's and a dodgy thread. Follow Rhinoceros through the first bulge then take the subtle groove line up right. At it's end climb up to a poor break (rubbish insitu thread) then direct up above.18) Blood Lust E4 6b
A veritable classic of it's genre. Had many-a-scalp but reputedly not too bad if you get on with it! The all-too-obvious horrendous crack right of Rhinoceros. 1) Climb to the roof. Sort out some gear then fight up the crack to a large flake. At the top of the crack move right then carry on pretty much direct to the top.19) Levitation Direct HVS 5b
Not quite as brutal as Blood Lust but no pushover, especially for the shorter climber. Climb to then through the overhang, via a flake, to gain the original route.20) Levitation Very Severe 4b **
An immensely enjoyable route with one scary step across. Start to the right of the line of overhangs at a crack. 1) Follow this and continue up left to gain a ledge. Contine leftwards with a scary step (the direct start joins from below here) the carry on up, through a small bulge, then more easily up to the top.20b) Levi E1 5b
Good, independent climbing between the upper section of Levitation and Nameless. Start immediately left of Levitation, below a crack in an overhang. Climb the crack, making use of obvious flakes on the left, to join Levitation. Continue directly by delicate, well protected climbing to a belay ledge.21) Nameless Very Difficult
Start up Levitation but climb direct up mossy slabs!22) Capstan Very Difficult
The vague line right of Nameless. Again a tad mossy.There are a couple of good traverses:
23) Low Man Girdle E3 5a,6a,4b *
Start on the right of the wall, as for Levitation. 1) Follow Levitation to where it moves up and continue leftwards along the break to eventually gain the belay of Avaition (on the large flake). 2) Keep on traversing the break, with crux moves through Interrogation (passing an old peg), to a belay beneath the overhanging chimney of Raven's Gully. 3) Nip up the chimney to finish. Originally the route carried on traversing leftwards to the end of the crag.24) Dehydration E2 5c,5c, - *
A right to left along the higher break. 1) Start between Levitation Direct and Ordinary starts. Climb to join and follow Levitation to a belay in the top break. 2) Follow the break leftwards, passing through Rhinoceros, to eventually gain the finish of Interrogation Pitch 1. 3) Scamper up the easy chimney to finish.
MYRTLE TURTLE QUARRY
A five minute walk along a vague path from Lowman/Haytor (roughly to the westerly) are some obvious slag heaps - this marks the Myrtle Turtle Quarry.
The highest wall in the quarry is contains a thin crack.
Myrtle Turtle E3 5b **
Climb the wall, just right of the crack. Very worthwhile but very bold - usually soloed.Timmy Tortoise E1 5c
Start to the right of Myrtle Turtle. Trend up right on an obvious line of slopers until a harder move leads up a thin break. Reach the ledge above and a quick mantelshelf gain the top.The Legend of Pip E2 5b *
A short but smart little route. If stood facing Myrtle Turtle look left and there's an obvious clean wall. From a ledge to the left step right, onto the wall, then climb direct to the top. Unprotected and with a rather poor landing.Angin Wiv Me Bitches HVS 4c A route for homeboys which climbs the flake corner type thing left of The Legend...